How To Build Product Launch Email Sequences for Electronics Brands
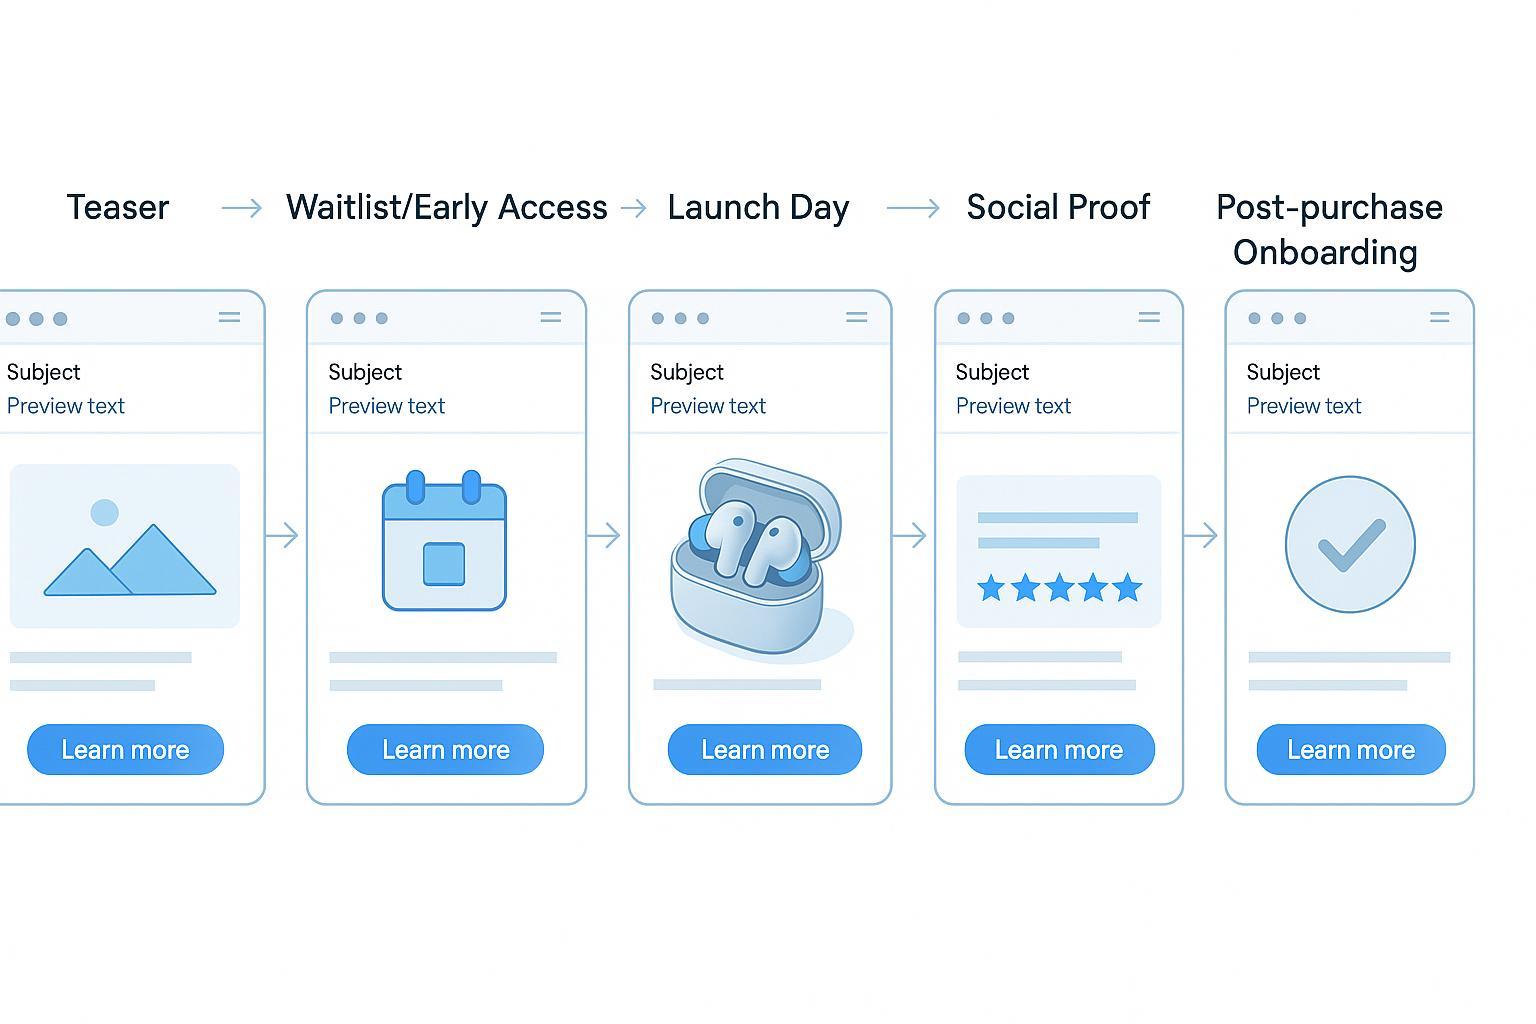
Launching electronics isn’t just a date on the calendar—it’s a coordinated sequence that educates, excites, overcomes objections, and onboards customers so they actually experience the value you built. This how-to guide walks you through a complete, phase-by-phase email program purpose-built for electronics brands, from pre‑launch prep to post‑purchase onboarding, with verification checkpoints and troubleshooting at every step.
What you’ll achieve by the end:
- A ready-to-deploy launch sequence tailored to electronics nuances (specs, comparisons, warranty/returns, accessories)
- Clear timing and cadence recommendations you can test safely
- Practical personalization recipes and behavior-triggered branches
- A measurement and attribution plan you can trust
Why this works: Electronics buyers research heavily and are influenced by social content and creator demos across the entire funnel. According to the Snapchat/Publicis/NRG global study summarized in the 2025 Powering the Purchase report (Snap Inc.), social platforms drive discovery, consideration, and even post‑purchase sharing—so your emails should orchestrate with that behavior instead of competing with it. Shopify also highlights research-heavy shopping and the importance of structured product info in its 2025 Consumer Electronics trends overview (Shopify).
Phase 0 — Preparation (Start 7–10 days before your first teaser)
Goal: Ensure deliverability, tracking, segmentation, and support readiness before you send a single teaser.
Do this:
-
Authenticate your sender domain
- Set up SPF, DKIM, and DMARC (at least p=none) and verify alignment. Google’s 2024 requirements for bulk senders emphasize authentication and low spam complaints—see Gmail’s 2024 protections overview (Google).
- Verify domain reputation and complaint rates in Google Postmaster Tools (Google).
-
Clean and segment your list
- Suppress unengaged contacts (e.g., no opens/clicks in 90–120 days) and explicitly segment by product relevance: current device owners, adjacent-category prospects, and accessory-only shoppers.
- For international brands, separate regions if your launch timing, pricing, or regulations differ.
-
Instrument tracking and UTMs
- Standardize UTM parameters (utm_source, utm_medium=email, utm_campaign, and optionally utm_content) and test your links end to end. See the Campaign URL builder guidance (Google Support).
- If you need a first-party tracking primer for ecommerce email and pixel setup, review this step-by-step Getting started guide (Attribuly Help Center).
-
Ready your product information architecture
- Product pages must include spec sheets, comparison charts (vs. previous model and main competitors), warranty and returns policy, financing options, and accessory compatibility.
- Prepare short-form demos and creator reviews you can link in emails.
-
Align support and legal
- Ensure CAN‑SPAM compliance (clear from name, no deceptive subject lines, postal address, easy one‑click unsubscribe). The FTC outlines the essentials in its CAN‑SPAM Act compliance guide (FTC, 2024 update).
- Prepare macros for common pre‑launch questions (compatibility, battery life, shipping dates, returns).
Verification checklist:
- DNS authentication passes and Postmaster shows healthy reputation
- Standard UTMs fire in test sends and populate analytics correctly
- Segments exist for owners, considerers, and accessory-focused shoppers
- PDPs include specs, comparisons, warranty/returns, and financing details
If things go wrong:
- Low inbox placement in seed tests: re-check SPF/DKIM/DMARC and reduce frequency to engaged-only while reputation improves
- Analytics missing UTMs: fix link templates in your ESP and re-test before broadcasting
Phase 1 — Teaser / Pre‑launch (10–14 days out; 1–2 emails)
Objective: Build curiosity and a qualified waitlist while educating on the core problem the product solves.
Who to target:
- Engaged subscribers and past buyers in adjacent categories
- Owners of the previous model (with a tailored “what’s improved” angle)
What to send:
- Email 1 (Teaser): Problem/solution narrative, one signature spec hint, and a waitlist CTA. Link to a 30–60 second demo or creator reaction.
- Email 2 (Optional): Use-case spotlight or behind‑the‑scenes engineering note; reiterate the waitlist.
Electronics-specific tips:
- Lead with the use-case, not the spec. Then map spec to outcome (e.g., “longer battery life → 2 workdays of travel without charging”).
- Seed compatibility and accessory ecosystem hints early.
Verification metrics:
- Landing page → waitlist conversion rate
- List growth rate and teaser click-through rate (CTR)
Troubleshooting:
- Low opens: test curiosity-led subject lines and strengthen preview text; prune unengaged segments temporarily
- Low CTR: move the use-case higher, embed a short demo link, and ensure the waitlist CTA is primary
Phase 2 — Waitlist / Early Access / Preorder (5–7 days out; 1–2 emails)
Objective: Convert interest into commitments (early access or preorder), and pre‑empt technical objections.
Who to target:
- Waitlist first; then broader engaged segment if capacity allows
What to send:
- Email 1: Announce launch date/time, core benefits, clear value prop, and early access promise. Include financing/warranty basics and a “Compare vs. last model” link.
- Email 2 (Optional): Social proof seeds—creator preview links, lab tests, stress demos; reinforce early access.
Dynamic branches to set up:
- Clicked “specs” → follow up with side‑by‑side comparison
- Visited warranty/returns → send plain-language warranty and returns explainer
- Clicked accessories → show compatibility chart and bundle options
Verification metrics:
- Waitlist-to-early-access uptake
- Clicks on financing and warranty content
Troubleshooting:
- High questions about compatibility: add a compatibility widget and a one‑pager linked from the email
- Preorder hesitation: clarify shipping dates, return windows, and financing examples
Phase 3 — Launch Day and Launch Week (1–2 emails on Day 0; 1–2 follow-ups in Week 1)
Objective: Convert pent‑up demand, while keeping friction low and expectations clear.
Launch Day plan:
- Morning send: Full reveal—price, availability, bundles, trade‑in (if any), and top 3 value props. Prominent “Shop now” CTA to PDP or bundle builder.
- Evening reminder (optional): Scarcity update tied to inventory reality; highlight one compelling review or creator pull‑quote.
Follow-ups (Days 2–4):
- One objection-buster email focused on comparisons and real‑world tests (battery, durability, latency, etc.).
- One accessories/bundle spotlight with compatibility chart and “add in 1 click” offer.
Verification metrics:
- Revenue per recipient (RPR) and placed order rate (POR)
- Payment failure rate and clicks on financing options
Troubleshooting:
- High traffic, low conversion: tighten PDP above-the-fold (value props, price, CTA), move comparison table higher, and ensure mobile speed
- Inventory issues: be transparent; offer back‑in‑stock notifications or lead times; avoid false urgency
Phase 4 — Social Proof & Objection Handling (Days 2–10; 2–3 emails)
Objective: Overcome hesitations with evidence customers trust.
What to send:
- Reviews and UGC round-up (short videos, unboxings, creator tests)
- Side‑by‑side comparisons vs. last model and key competitors
- Warranty/returns transparency and “how we test” behind‑the‑scenes
Tips:
- Link to creator demos that match your main objections (e.g., real battery rundown, drop tests). Omnisend’s examples show how brands pace these messages in the launch arc; see the Product launch examples and templates (Omnisend, 2024).
- Clicks to comparison/spec pages
- Support ticket topics (are questions shifting from “what is it?” to “how do I set it up?”)
Troubleshooting:
- Low CTR: use shorter, more visual emails and lead with a single killer proof point
- Rising unsubscribes: reduce frequency to engaged segments only and refocus on clarity over hype
Phase 5 — Post‑purchase Onboarding (Immediate to Day 14; 2–3 emails)
Objective: Ensure customers get set up, register warranties, and attach accessories they’ll actually use.
Flow structure:
- Immediately after purchase (transactional, from your platform): Order and shipping confirmations
- 2–3 days after delivery: Setup guide with step‑by‑step video; link to firmware updates and FAQs
- ~14 days after delivery: Review request + prompt to register warranty if not already done
For content and timing inspiration, Klaviyo outlines effective post‑purchase elements in its post‑purchase email guide (Klaviyo, 2024).
Verification metrics:
- Setup completion rate (guide clicks, video views)
- Warranty registrations
- Accessory attach rate (e.g., cases, chargers, mounts)
Troubleshooting:
- Many support tickets on first steps: add a 90‑second quickstart video and a printable one‑pager; link them prominently
- Low review response: space follow-ups by 3–5 days and offer guidance on what to mention (battery life, comfort, compatibility)
Personalization and Dynamic Content Recipes (Electronics-specific)
Implement at least two of these in your initial launch; expand over time:
- Ownership-based: If “owns Model A,” show “What’s improved in Model B” and a trade‑in option.
- Category interest: If subscriber browsed audio, prioritize ANC/battery life modules; if gaming, prioritize latency/refresh rate.
- Price sensitivity: If clicked financing info, keep financing explainer block sticky across messages.
- Post‑purchase: If not registered warranty by Day 7, trigger a plain-text nudge from Support.
Verification tip: Run A/B tests on dynamic blocks and measure incremental CTR on the blocks’ primary links.
Cadence and Deliverability Safety Nets
Baseline to test:
- Pre‑launch: 1–2 emails per week for engaged segments; ramp to 2–3 in launch week, then taper
- Outside launch windows: many brands succeed with weekly or bi‑weekly sends, but always segment by engagement
Why this rhythm: As a starting point, email cadence research suggests that sending between monthly and twice per week tends to balance engagement against fatigue; see the Email cadence best practices (MailerLite, 2024). Use this as a test baseline—your audience may prefer more or less.
Deliverability must‑dos:
- Keep spam complaint rate low and authentication aligned per Gmail’s 2024 bulk sender requirements (Google)
- Monitor domain reputation and spam rates inside Google Postmaster Tools (Google)
- Honor one‑click unsubscribe; avoid sudden frequency spikes to unengaged segments
Measurement and Attribution You Can Trust
Track these core metrics per phase:
- Engagement: Open rate (OR), Click‑through rate (CTR)
- Conversion: Conversion rate, Revenue per recipient (RPR), Placed order rate (POR)
- Health: Unsubscribe rate, Spam complaint rate, Bounce rate
- Post‑purchase: Setup completion, Warranty registration rate, Returns rate, Accessory attach rate
Make data comparable:
- Use consistent UTMs across all launch emails; see UTM parameter definitions (Google Support)
- Break out performance by segment (owners vs. considerers vs. accessory shoppers) and by phase
Example neutral workflow (product mention):
- Disclosure: Attribuly is our product. For multi-touch clarity, connect Attribuly with your ESP to unify onsite behavior with email events and view launch‑cohort paths; pairing this with a Klaviyo connection makes it easier to tie launch flows to revenue—see the Klaviyo integration overview (Attribuly).
Practical tip: Before you scale, run a small A/B split of your launch cohort with slightly different cadences to validate impact on RPR and unsubscribe rate.
Compliance and Trust Builders
- Email compliance: Follow the CAN‑SPAM essentials (FTC, 2024): truthful headers/subjects, physical address, and easy opt‑out.
- Transparency: Always link to full warranty terms and returns policy. Avoid inflated claims; back specs with credible tests and clear conditions.
- Accessibility: Use readable typography, adequate contrast, alt text on key images, and tap‑friendly CTAs.
Quick Launch QA Checklist
Run this the day before you send your first teaser:
- Deliverability: SPF/DKIM/DMARC pass; seed inbox placement; Postmaster shows healthy reputation
- Tracking: UTMs applied consistently; test clicks resolve to correct PDPs with clean parameters
- Segments: Owners, considerers, accessory shoppers built and spot‑checked
- Creative: Subject lines and preview text finalized; mobile rendering confirmed; alt text present
- PDPs: Spec sheets, comparison tables, warranty/returns, financing clearly visible above the fold
- Support: Macros prepared for compatibility, shipping dates, financing, and returns
Troubleshooting Matrix (If X, try Y)
- Low open rate on teasers
- Test curiosity-led subjects, rewrite preview text with a concrete benefit, and send to engaged segments first
- Low CTR on launch day
- Move value prop bullets above the fold, add a short creator demo link, and reduce secondary links
- Rising unsubscribes during launch week
- Tighten to engaged-only segments, decrease frequency, and replace hype with clear comparisons/warranty transparency
- Deliverability dip
- Pause unengaged segments, re-check authentication, and monitor Postmaster Tools (Google) for spam rate and reputation
Optional: Further Reading for Electronics Teams
- A practical example of lifecycle measurement in an electronics context: the Sylvox case study (Attribuly)
Your 30‑Day Launch Plan at a Glance
- Week 1: Complete Phase 0 prep; build segments; QA tracking; finalize specs/comparisons
- Week 2: Teaser emails (1–2); grow waitlist; test subject lines and preview text
- Week 3: Early access/preorder (1–2); branch by behavior; prep launch-day creative
- Week 4: Launch day AM send (+ optional PM reminder); social proof follow‑ups; onboarding flows live
Keep iterating: Use segment‑level RPR and unsubscribe trends to tune cadence. Keep creator demos and comparison assets refreshed as reviews roll in.
Sources and benchmarks cited in this guide
- Consumer electronics journey insights: 2025 Powering the Purchase CE study (Snap Inc.)
- Research-heavy CE commerce and PDP discipline: 2025 Consumer Electronics trends (Shopify)
- Safe cadence baseline: Email cadence best practices (MailerLite, 2024)
- Launch email examples: Product launch email templates (Omnisend, 2024)
- Deliverability guardrails: Gmail 2024 bulk sender requirements (Google) and Google Postmaster Tools
- Post‑purchase best practices: Klaviyo post‑purchase email guidance (2024)
- UTM standards: Campaign URL parameters (Google Support)
- Email compliance essentials: CAN‑SPAM compliance guide (FTC, 2024)